
Textured metal jewelry is easiest to judge as a system, not as a collection of random marks. Look for a repeatable scale, a readable direction, resolved edges, and deliberate transitions between bright, matte, and dark areas. Those cues may indicate intentional surface work; a photograph cannot prove how the surface was made, what metal it is, or whether an irregularity is a defect.
When one mark interrupts the established pattern, changes the outline, crosses an edge, or appears sharper and fresher than the surrounding surface, treat it as a question rather than automatic proof of damage. Ask the seller for clear views from several angles and check the current product page for the stated material, finish, dimensions, construction, and care.
How to tell deliberate texture from accidental damage
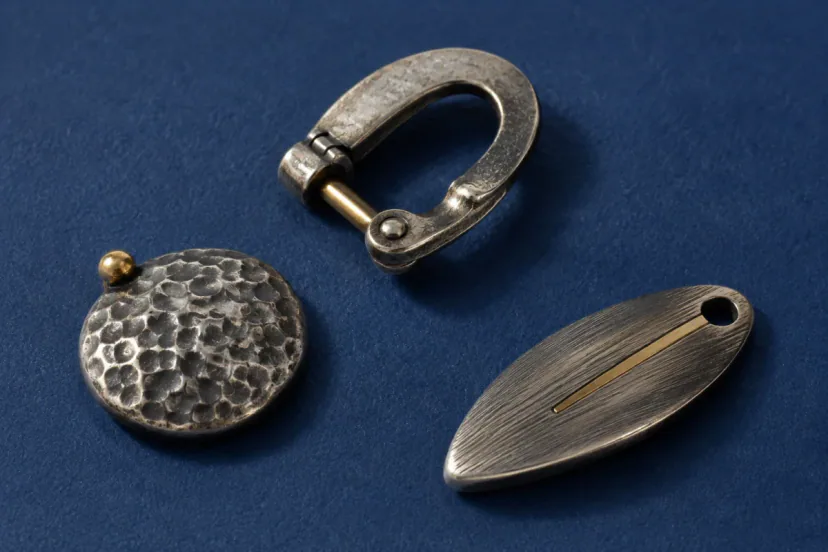
Intentional texture usually has a visual grammar. It may vary from mark to mark, but the variation tends to stay within a controlled range and relate to the form. Rio Grande’s hammer-texture reference explains that hammer-face shape, curvature, and scale affect the marks produced; it also describes planishing as a field of overlapping marks and shows that bold texture can be deliberately contrasted with smoother or more lightly textured zones.
- Scale: Compare each mark with the size and curvature of the piece. A texture can be fine or bold, but a single outlier deserves another view.
- Direction: Look for lines or impressions that follow, cross, or rotate around the form in a readable way. Random scratches may come from wear, handling, finishing, or deliberate design; direction alone does not diagnose the cause.
- Repetition: Intention does not require machine-perfect sameness. It is more useful to ask whether spacing, depth, or rhythm repeats within a coherent range.
- Edge finishing: Inspect rims, openings, joins, setting edges, and body-contact areas. A surface pattern may stop before an edge or continue over it, but the transition should look resolved rather than accidentally torn, chipped, or burred.
- Transitions: A crisp change from matte to polished, light to dark, or rough to smooth may indicate a planned hierarchy. A blurred transition may also be intentional, so ask how the finish is described instead of naming the process from the image.
Possible damage is more concerning when it changes function or structure: a crack, split, lifted surface layer, distorted opening, loose setting, or sharp projection is not made harmless by being visually irregular. Photographs can still conceal depth and movement, so request clarification before drawing a conclusion.
Surface-reading comparison: what a photograph can and cannot prove
| Surface category | How to read it |
|---|---|
| Hammered or planished marks | May suggest: Repeated dimples, facets, or subtle overlapping impressions at a consistent scale may indicate a planned hammered or planished field. A clear dividing line beside a smoother zone may also be deliberate. Cannot prove: hand hammering, a particular hammer, the metal, mark depth, or whether casting, stamping, rolling, or another process produced a similar appearance. |
| Brushed or satin directional lines | May suggest: Fine lines running in a consistent direction, following the form, or ending at a clean dividing line may read as brushed or satin finishing. Cannot prove: the abrasive method or whether the lines are the intended finish rather than wear scratches, reflections, dust, or image processing. Ask for the named finish and another lighting angle. |
| Sandblasted or matte diffuse surfaces | May suggest: An even, low-glare field with softly distributed highlights may read as matte; a precise transition into a polished area may strengthen the impression of intentional contrast. Cannot prove: sandblasting, surface chemistry, coating, plating, or metal composition. Flat light and post-processing can also suppress reflections. |
| Polished high points beside dark recesses | May suggest: Repeated bright raised areas beside consistently dark recesses may indicate a designed light-dark hierarchy, especially when the contrast follows a pattern around the form. Cannot prove: intentional oxidation or patina. Shadow, tarnish, residue, plating, coating, wear, and editing can produce a similar tonal effect. |
| Engraved or cut lines | May suggest: Crisp recessed lines with purposeful starts, stops, spacing, and changes of direction may indicate engraving or another cutting process. Engraving, as a documented process, cuts or carves a design into a hard surface and can create texture. Cannot prove: whether the lines were hand engraved, machine engraved, laser cut, stamped, cast, or simulated, or establish their depth, permanence, or condition. |
Read rings as forms, not keyword labels
When a listing uses hammered silver ring, the words alone do not establish either silver content or hand hammering. Compare the size and overlap of the marks, ask whether the pattern is struck, cast, stamped, rolled, or otherwise produced, and confirm the stated metal, dimensions, inside profile, and care on the current product page.
The label texture ring is broader still. Request clear views of the top, sides, inside, and edges, then check whether the surface continues logically around the form or stops at a deliberate dividing line. A frontal image cannot establish edge comfort, weight, texture depth, or how the finish will change with wear.
For a textured band ring, examine the full circumference rather than one hero angle. Repetition may continue all the way around, change scale near an opening or join, or give way to a smooth interior; none of those choices is automatically a flaw, but the seller should be able to describe the construction and show the transition clearly.
A textured gold ring needs the same material discipline: gold color is not proof of solid gold, a particular alloy, vermeil, plating, or any other construction. Read the exact product-level metal and surface-application details before making care, durability, or value assumptions.
- Name the surface: Look for a specific description such as hammered, planished, brushed, satin, matte, oxidized, engraved, cast texture, or stamped texture rather than a vague promise of uniqueness.
- Request enough views: Use front, profile, back, inside, edge, and closure views to understand continuity and contact points.
- Read the transitions: Check where one finish stops, another begins, and the surface meets an edge, opening, join, setting, or fastening.
- Check construction separately: Confirm metal, alloy, plating or coating, stones, treatments, dimensions, weight when available, and any care restrictions.
- Resolve uncertainty before purchase: If a dark recess, isolated dent, line, or surface lift is unexplained, ask the seller rather than deciding from styling photography.
Style texture by choosing one lead surface
Texture brings close-range detail to a restrained silhouette. One matte plane, repeated hammered rhythm, or cut line can hold the eye without requiring several competing pieces. This is where textured jewelry overlaps naturally with sculptural jewelry: surface, contour, negative space, and body placement work together.
When two metal colors appear together, repeat one reason for the combination—similar mark direction, related scale, one shared curve, or a deliberate polished-to-matte contrast. Use the mixed metal jewelry guide for styling structure, then check each piece’s actual composition and care separately.
At conversational distance, texture often reads through changing highlights rather than minute tool marks. Keep one surface as the anchor and let clothing hardware, fabric sheen, and any second piece support it rather than reproduce every detail.

Care limits: preserve the finish you actually own
There is no single cleaner for every textured surface. GIA’s jewelry-care guidance notes that chemicals can damage or discolor metals and harm some gems; treatments may be affected by heat, solvents, steam, or ultrasonic cleaning; and ultrasonic vibration is not safe for every piece. Identification comes before intervention.
To clean oxidized silver jewelry, first confirm that the dark areas are an intentional finish and follow the instructions for that exact piece. Do not assume a general silver-polishing routine belongs on every dark recess: what appears black in a photograph could be intended oxidation, tarnish, residue, shadow, plating, coating, or another treatment.
For a combined piece, mixed metal jewelry cleaning should begin with a component-by-component check. A method compatible with one metal may not suit a second metal, a surface application, a treated gem, or an intentionally darkened finish, so a cautious approach is to follow the most restrictive documented care instruction for the assembled piece.
- Read the current product information: Confirm every stated material, surface application, stone or non-metal component, treatment, and care warning.
- Inspect before cleaning: Look for loose settings, cracks, lifted coatings, unstable joins, or distorted fastenings. Stop if cleaning could move or worsen them.
- Use only a compatible method: Do not use polish, dips, solvents, steam, abrasives, or an ultrasonic cleaner unless the maker or seller confirms that method for the complete piece.
- Preserve intentional contrast: Treat polished high points and dark recesses as different finish zones until the product instructions say otherwise.
- Store to reduce contact: Keep pieces separated or padded so hard edges and textured high points do not repeatedly rub other jewelry.
For material-first care steps, use Switchroom’s jewelry care card. For silver-specific distinctions between tarnish, oxidation, plating, stones, and surface finish, continue to the silver jewelry cleaning guide.
FAQs about textured metal jewelry
How can I tell whether a texture is intentional or accidental damage?
Look for coherence across scale, direction, repetition, edge finishing, and transitions. An isolated gouge, crack, lifted layer, distorted opening, or sharp projection deserves clarification, but a photograph still cannot diagnose process or condition. Ask for multi-angle close-ups and a written explanation from the seller.
How should I care for a textured silver finish?
Good silver jewelry care begins by identifying the exact silver construction, any plating or coating, intentional oxidation, stones, and the stated finish. Follow product-specific instructions, keep pieces separated in storage, and avoid strong methods that have not been confirmed for the complete piece.
Can I identify oxidized recesses from a product photograph?
No. Dark recesses may indicate intentional oxidation, but they may also be shadow, tarnish, residue, coating, plating, wear, or image treatment. Ask the seller to name the finish and explain how it should be maintained.
Can I use an ultrasonic cleaner on textured jewelry?
Not from appearance alone. Texture does not determine ultrasonic safety; the complete construction, gems, treatments, coatings, settings, and condition matter. GIA advises that ultrasonic cleaners are unsuitable for some materials and treatments and that vibration can loosen or chip certain set gems.
Does a matte surface prove that jewelry was sandblasted?
No. Low glare may suggest a matte finish, but it does not identify the method. Sandblasting, abrasive finishing, casting, coating, wear, lighting, and image processing can create similar visual results. Check the seller’s exact finish description.
What should I ask before choosing textured metal jewelry?
Ask for the named surface process, exact material and surface application, dimensions, weight when available, views of the edges and body-contact areas, a complete rotation or back view, and care instructions for every component. Then compare those answers with the current product page.
A precise surface is a relationship, not a promise
The strongest textured jewelry gives the eye a readable route: marks relate to scale, direction follows or challenges the form, repetition creates rhythm, edges are resolved, and transitions establish hierarchy. That visual coherence can help you select a piece, but it is not proof of handwork, provenance, material, durability, or condition.
Use photographs to notice and compare. Use confirmed product information to choose. When you are ready to apply that distinction to current listings, browse the full jewelry edit and check each product page for exact materials, dimensions, finish, care, and availability.
Sources and further reading
- Rio Grande: Bill Fretz’s Guide to Hammer Textures
- Rio Grande Guide to Engraving for Jewelers
- GIA: Tips on Caring for Jewelry
- V&A Jewellery collection
Use these observations as a reading method, then check the current product page or ask the seller for exact materials, finish method, dimensions, care, and availability.