
Learning how to wear ear cuffs should not occupy your entire afternoon. A well-placed cuff changes the outline of the ear without turning fit into a struggle.
The appeal is simple: a small piece can add the visual rhythm of an ear stack without requiring another piercing. The confusing part is that not every cuff is built the same way. Some are gently adjustable; others are solid and should never be forced. Some sit high on the helix, while others settle closer to the middle of the ear. The right method therefore begins with the piece in your hand—not a universal squeezing contest.
Here is the short version: identify the construction, enter at the thinnest part of the upper ear, slide the cuff into position and stop when it feels secure rather than tight. Then style around it as one deliberate spatial anchor.
How to wear ear cuffs without crowding the ear: let one cartilage cuff lead the silhouette.
Room Key note: Ear cuffs are an eligible jewelry category inside profile-matched Room Key semi-blind edits when the edition, subscription level and saved Jewelry Profile allow it. The category belongs to the subscription edit; because the edit is semi-blind, the exact pictured cuff, finish and edition are not guaranteed.
First, check what kind of ear jewelry you have
Before putting anything on, distinguish among three pieces that search results often blur together:
- Ear cuff: usually wraps around the outer cartilage and often does not require a piercing.
- Ear climber or ear crawler: usually enters through a pierced lobe, then turns upward so the decorative line follows the ear. Its closure and direction are product-specific.
- Ear jacket: normally uses a front stud and a decorative component behind the lobe.
These terms describe different mechanisms. A technique written for an adjustable cuff should not be copied onto a rigid cuff or a pierced climber. If the product page does not show the opening, closure, dimensions and on-ear view, pause and ask for those details.
How to Wear Ear Cuffs: Step by Step
1. Find out whether the cuff is adjustable
Look at the product instructions before bending the metal. An adjustable cuff may allow a small change at the opening. A solid cuff is designed to keep its shape and should be positioned through the existing gap. Jenny Bird’s product-specific instructions distinguish solid cuffs from malleable designs; that difference is a useful reminder that construction comes before technique.
2. Start at the thinnest part of the upper ear
Use one hand to hold the upper ear steady. Bring the cuff to the narrow outer edge rather than trying to push it directly onto the thickest part of the cartilage.
Mejuri’s ear-cuff guide starts at the top of the ear and then slides the cuff down. Astrid & Miyu similarly advises entering through the thinner upper edge before moving the cuff toward its final position. The shared principle is simple: enter where the path is easiest; do not force the widest part through the opening.
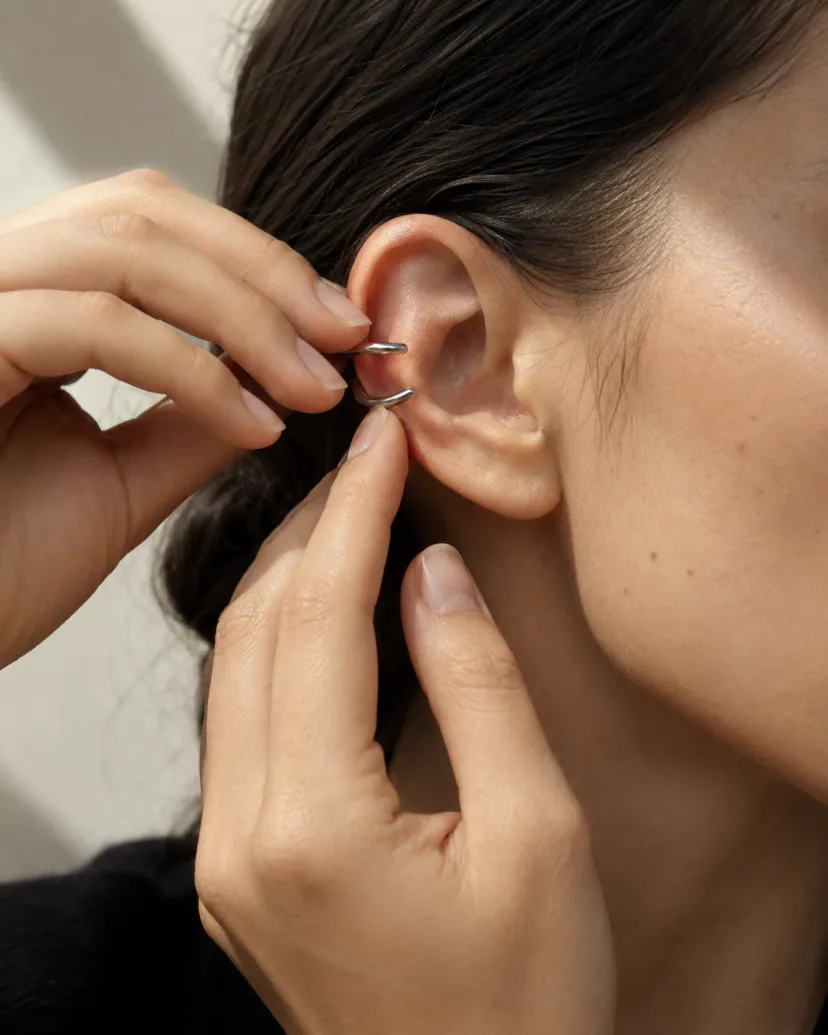
How to put on an ear cuff: begin at the thinner outer edge and follow the actual maker’s instructions for the cuff’s construction.
3. Slide and rotate—do not yank
Once the opening has passed over the edge, slowly slide the cuff downward. A slight rotation toward the inner ear can help the piece settle around the cartilage. Keep the movement small and controlled.
If the cuff catches, remove it and begin again. Pulling harder is not a fit strategy.
4. Choose a secure position
The best position is where the cuff feels stable and visually intentional. Depending on the design and your ear anatomy, that may be high on the helix or closer to the middle of the outer ear.
A secure cuff should feel present but not painful. If you notice pinching, numbness, throbbing or persistent redness, remove it and reassess the fit. Jewelry should not require you to negotiate with your circulation.
5. Perform a gentle security check
Turn your head, lightly touch the cuff and check it in a mirror from the front and side. It should remain seated without aggressive pressure.
For an adjustable design, follow the maker’s instructions for a minimal closing adjustment. For a solid design, do not squeeze it simply because another brand’s guide recommends squeezing an adjustable cuff.
6. Remove it by reversing the path
Slide the cuff back toward the thinner entry point and ease it over the edge. Do not pull it straight outward from a thicker section of cartilage. Store it separately so the opening and surface are not distorted or scratched.
How tight should an ear cuff be?
Think “secure contact,” not “clamp.” The cuff needs enough contact to resist ordinary movement, but pain is not proof of a good fit. Ear shape varies, and a style that is secure on one person may sit poorly on another.
This is why a useful product page should include:
- opening or internal dimensions;
- whether the design is adjustable or solid;
- weight;
- recommended placement;
- front, side and rear on-ear views;
- removal and care instructions.
“One size fits all” is not a responsible substitute for that information.
Five ways to style an ear cuff
1. Let one cuff lead
Start with the cuff as the strongest shape near the face. Add a small stud or quiet hoop only if it supports the line. This keeps a sculptural piece from disappearing into an overcrowded stack.
2. Use asymmetry on purpose
Wear the cuff on one ear and a different earring on the other. The two sides do not need to match, but they should share one visual rule: metal tone, curve, texture, scale or direction.
Asymmetry works best when it looks edited. “I lost the other earring” is a charming life event, but it does not have to be the composition.

Ear cuff earrings styling: a single cartilage cuff and a quiet lobe earring create an edited asymmetrical stack.
3. Repeat one shape
If the cuff has a rounded profile, echo it with a hoop, curved ring or rounded neckline. If it is linear, repeat that direction in a narrow drop earring, seam or chain. Repetition makes an unusual form feel connected to the rest of the look.
4. Mix metals through a bridge
Gold and silver can share the same ear stack when one element creates a bridge: a two-tone piece, repeated polished surfaces or the same geometric language in both metals. Keep the number of competing textures low while the metal contrast does the work.
For a broader placement guide, continue to the Switchroom guide on mixing metals across earrings, necklaces and rings.
5. Use hair and neckline as negative space
An ear cuff is partly a silhouette piece. Tucked hair, a short cut or a clear neckline can reveal a small cuff more effectively than adding a larger piece. With loose hair, choose placement and scale after checking whether the cuff catches or disappears during normal movement.
Ear cuffs versus ear climbers
Both can draw the eye upward, but they solve the problem differently.
An ear cuff usually grips the outer ear. An ear climber usually begins at a piercing and follows the ear through a post, hook or other product-specific closure. That means “how to wear an ear cuff” should not silently redirect to an ear climber product unless the page explains the difference.
Switchroom has a catalog candidate for an ear climber, but its current closure, piercing requirement, dimensions, left/right configuration and on-ear mechanism still require live product verification. That blocks exact-SKU claims, not the truthful Room Key category bridge: ear cuffs can appear in eligible, profile-matched semi-blind edits, while the exact cuff, finish and edition remain part of the curation rather than a promise. Use the Switchroom ear-cuff topic for placement context and check the exact piece details on the current product page.
Try the three-minute snag test: headphones, hair and collars
An ear cuff can feel perfectly placed in the mirror and still argue with the rest of your day. Before you leave home, test the combinations that actually touch your ear: glasses, over-ear or on-ear headphones, a phone, loose hair, a scarf and the collar of your coat. The aim is not to prove that a cuff is universally “snag-free.” It is to notice where this particular shape meets your particular routine.
Start with headphones while the cuff is already in its stable position. Put them on and take them off slowly. If the ear cup presses the cuff into cartilage, changes its angle or catches the opening, move the cuff or choose a different piece. Earbuds create less outer-ear contact, but their stems, cases and the motion of adjusting them can still knock a lower cuff.
Next, sweep your hair forward and back with your hands, then put on the top layer you expect to wear. High collars, hoods, knitwear and loosely woven scarves are the useful tests. If a thread, curl or edge repeatedly finds the cuff, do not rely on being careful all day. Change the placement, secure the hair, choose a smoother silhouette or leave the cuff at home.
Finish with a short movement check: turn your head, answer the phone, shoulder a bag and remove your coat. A secure cuff should stay where you placed it without pinching. If it shifts, leaves persistent discomfort or needs repeated squeezing, remove it and check the maker’s fit guidance. The elegant choice is the one you can stop monitoring.
After wear, inspect the contact point and the cuff opening before returning it to storage. Wipe only according to the confirmed material and finish; if either is uncertain, begin with the material-first care card. You can also record headphone, hair and collar conflicts in your Jewelry Profile so the next choice starts with what your day really asks of it.
A quick pre-wear checklist
- Did you identify whether the piece is a cuff, climber or jacket?
- Is the cuff adjustable or solid?
- Are you entering at the thinnest edge of the ear?
- Does it feel secure without pain or numbness?
- Can you see the front, side and rear fit?
- Does the styling have one clear focal point?
- Did you follow the care instructions for the actual material and finish?
The best ear-cuff styling is not about building the busiest ear. It is about placing one small piece where it changes the silhouette—and then knowing when to stop.
Frequently Asked Questions
Do you need pierced ears to wear an ear cuff?
Many ear cuffs are designed for unpierced ears because they sit around the outer cartilage. Ear climbers, ear jackets and some cuff-like designs may require a piercing. Check the specific closure rather than relying on the product name alone.
Which ear should I wear an ear cuff on?
Either ear can work unless the design is made for a specific left/right orientation. Choose the side that is most comfortable and best supports your hairstyle, existing piercings and overall composition.
How do I stop an ear cuff from falling off?
Enter through the thinner upper edge, slide the cuff to a stable position and adjust it only if the maker confirms the design is adjustable. A solid cuff should not be squeezed. If the opening, dimensions or placement remain unclear, the product may not be the right fit for your ear.
Can I sleep, shower or exercise in an ear cuff?
Follow the material- and product-specific care instructions. Removing a cuff before sleep, water exposure or strenuous movement also reduces the chance of snagging or losing it. Plated finishes may require additional protection from water, sweat and cosmetics.
What is the difference between an ear cuff and an ear climber?
An ear cuff generally wraps around the outer cartilage and often needs no piercing. An ear climber usually passes through a pierced lobe and turns upward along the ear. Exact mechanisms vary by product.
Choose the next path
Save piercing, material-sensitivity and scale preferences in your Jewelry Profile, then explore the Room Key semi-blind jewelry subscription, where ear cuffs can rotate into eligible edits. You can also read more practical jewelry guides or shop the current exact-piece edit.